So far, you have learned how to change the icons of the desktop icons. This next section will show you how you can change the default icon that is displayed for any file type on your computer. Changing the icons is actually very easy; the most difficult part of the process is trying to figure out what icon to use. Additionally, keep in mind that you can use any of the new high resolution icons that you can download from the sites mentioned in the
Changing the Desktop Icons section in Chapter 3.
To get started changing your icons, you are going to want to use the Folder Options feature you used in the last section. Follow these steps to begin:
1. Open up Folder Options again by clicking My Computer. Then when it launches, click the Tools menu bar entry and select Folder Options.
2. Inside Folder Options, click the File Types tab to reveal the list of all of the different file extensions on your computer.
3. Browse through the list and select the extension for which you want to change the icon.
4. Once you have the entry selected, click the Advanced button.
5. On the Edit File Type screen, click the Change Icon button.
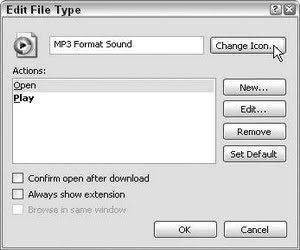
6. The Change Icon screen will be displayed. Here, you will be shown various system icons from which you can choose. If you do not find any that you like, just click the Browse button and select an icon that you downloaded on your computer.
7. Once you find the perfect icon, click OK to select the new icon.
8. Then click OK once more to save your changes. You don’t have to reboot after you make your changes, because you will see your changes immediately after you click OK to save them.
Read More..
Every time you click a file,Windows looks up what the default program to open for the file is from the registry. Then,Windows loads that application and tells the app what file to open up. This is something that we encounter almost all the time when we are using our computer. Often, when you install many programs on your computer, programs start to compete over which is going to be the default program to open up a file.
This commonly occurs when you install various music applications on your computer. I used Winamp to place CDs and MP3s on My Computer almost all the time. But when Apple released iTunes for Windows, I switched to that right away because of the cool library. Once I installed iTunes on My Computer, it took over all of my music files.Whenever I would insert a CD into my drive, iTunes would automatically load and start playing it.When I would click a MP3 file on my hard drive, the same would occur. What happened to My Computer when I installed iTunes is not always a bad thing. However, there are situations when I wanted to use Winamp to play my MP3 files. One big reason for this is that when I click an MP3 file and it plays in iTunes, it is automatically added to my library.When I am sorting through my collection of songs that I ripped from my old CDs, I don’t always want to add all of the songs to my library in iTunes because there are usually just two or three clicks on a 14-track CD. One easy solution to this problem is to change the file association back to Winamp so that when I click a file, it will be played in Winamp. Then if I like it, I can always add it to my library later within iTunes.
These next two sections will show you how to customize the default launch application for all of the different file types on your computer, as well as how your file types look.
Changing the default launch app
The information that Explorer looks up to find which program should be used to launch specific file types is stored in the System Registry under the HKEY_CLASSES_ROOT section. Using the Registry Editor, it is possible to browse to that key and then find the file type that you want to change and edit some keys, but there is a much easier way in Windows XP to accomplish the same task.
Hidden away in Folder Options within any Explorer window resides a useful utility to change the default application easily without having to worry about application IDs and file association structure. Just follow these steps to change any File Types default launch app:
1. Open up My Computer by clicking the desktop icon or on the icon in the Start panel.
2. When you have My Computer displayed on your screen, click the Tools menu bar item and select Folder Options.
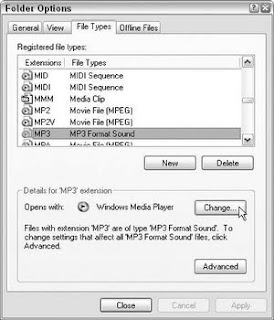
3. Once the Folder Options window appears, click the File Types tab.
4. Navigate through the list of file extensions until you find the extension of the file for
which you want to change the default app. Because I want to change my MP3 player
default launch app, I am going to select the MP3 file extension.When you find the file
extension that you want to change, select it by clicking it.
5. Click the Change button once you have your extension selected. The Open With properties window will load, asking you what program to load it with. It will show a list of common programs that you can choose from, but you are not limited to just those programs. Click the Browse button to navigate to any executable file on your computer to specify exactly what program you want to use if it is not on the list.
6. Once you have the application selected that you want to use, just click the OK button to save your changes. You are now finished with changing the launch app.
Your changes to file launch apps are activated immediately after you click OK to save your changes. Now you will no longer have to worry about applications taking control of your files.

Before visual styles were a part of Windows, only one way existed to change the way Windows looked. That was accomplished by using a program called WindowBlinds, which is made by Stardock (
www.windowblinds.net).WindowsBlinds is a classic Windows program. Back when it first came out, it transformed the boring gray interface of Windows into an attractive and colorful experience. Now that Windows XP includes its own skinning engine, products like WindowBlinds, which have their own skinning engine, become less necessary. So why am I even mentioning this application? Because there are some things that it brings to the table that visual styles do not.
Because WindowBlinds is a completely independent skinning engine from the Microsoft visual style engine, it has some features that the native engine does not have. One of these features is the ability to skin parts of the operating system that the native skinning engine cannot. The most talked about application that has this problem is the Command prompt in Windows. For some reason, Microsoft’s engine just does not apply visual styles to this window. Instead, it is displayed using the classic Windows interface.WindowBlinds will allow you to skin this app as well.
WindowBlinds has a very strong skin base. A lot of very talented people have created XP skins for WindowBlinds that just look great. One benefit of using WindowBlinds to change the way your computer looks is the set of additional features that it provides, one of which is the ability to “roll up” a window so that just its title bar is shown. This is a great feature that can be activated by just double-clicking the title bar on skins that support the feature.
Another benefit of using WindowBlinds is its ability to skin applications that were not made to be skinned. This is a nice feature, but can also result in some applications looking a little strange because their buttons and other visual elements are replaced, which often throws off the spacing and placement of controls.
The one controversial topic about WindowBlinds is its effect on system performance. Because it runs on top of your computer’s visual system and uses special system calls to change the way the computer looks, it takes up more system resources compared to the native visual style engine. Some users have a fast experience with WindowBlinds, although others do not. It really depends on your computer’s hardware.
My personal experience with WindowBlinds has not indicated that they have set any recordsetting speeds. I have run WindowBlinds on my computer a lot and have only noticed a decrease of performance in certain situations when I have used it with slower hardware. But my experience does not mean that you too will notice a slowdown. The speed of its operation seems to depend a lot on the specific hardware configuration of your computer, such as your video card and CPU. Also, even if you do notice a slowdown, it might be worth it if you find a really cool skin for WindowBlinds. Either way, I suggest that you give WindowBlinds a shot.
Using WindowBlinds to change the way Windows XP looks
WindowBlinds 4.2 is the latest version of this skinning app that will help you change the way
Windows XP looks. Follow these steps to get that version of WindowBlinds set up on your computer so that you can start experimenting with it:
1. Visit www.WindowBlinds.net or http://download.com.com/3001-2326-10251037.html for a direct link to download a copy of WindowBlinds. Proceed to step 2, when you have finished installing it.
2. The best way to get to WindowBlinds is by right-clicking the desktop and clicking the Appearance tab when Display Properties loads. Then, click the WindowBlinds button.
3. The WindowBlinds Advanced Configuration will load. In this window, you can change the active skin. Browse through the skins that came with WindowBlinds when you installed it by scrolling the horizontal scrollbar. Click a skin to see it in the Preview box.
4. Just like visual styles for the native skinning engine,WindowBlinds skins include slight variations of a specific skin in one file. This can be thought of as the different color schemes that you worked with earlier. Not all WindowsBlinds skins have different versions included, but those that do can be changed by selecting the version from the drop-down box.
5. Once you are satisfied with a particular skin, click the Apply This Skin Now button.
6. WindowBlinds will then load the skin and apply it to the whole user interface. If you
are happy with the way it looks, close the configuration editor and you are finished.
Otherwise, select a different skin and try it again.
WindowBlinds may be a good alternative to the built-in visual style engine if you like the skins better and the extra features that it adds. Stardock has a more advanced version of WindowBlinds, called WindowBlinds Enhanced, which offers even more features and control over the themes. However, that version is not freeware, so the decision as to whether or not to use it is up to you. The question really boils down to whether or not you would use the extra features that WindowBlinds Enhanced provides.
If you ever decide that WindowBlinds is not for you, just go to the Control Panel and select Add Or Remove Programs. Then uninstall WindowBlinds by selecting it from the drop-down list that appears. This method provides an easy way to completely remove WindowBlinds from your computer if you decide that it is just not working out for you.
Installing additional Windows XP skins for WindowBlinds
One of the benefits of using WindowBlinds is how easy it is to add and use additional skins. Stardock operates an excellent Web site for thousands of WindowBlinds skins called WinCustomize, located at www.wincustomize.com. To get started, open up your Web browser and visit www.wincustomize.com/skins.asp?library_1 for a list of all of the skins available.
Once you see the list of skins, to install one just hit the Download link and it should automatically start to download.When it is finished,WindowBlinds will automatically load it and will prompt you by asking if you would like to apply it. Once the skin is installed, you will be able to go back into the Advanced Configuration Editor to browse through the different versions and colors of the skin (assuming, of course, that the skin has multiple versions).

You now know how to install and use custom-made visual styles, but did you ever wonder how other people make visual styles? This next section will take you through the process of creating your own visual style as well as the history of how people started making them.
It all began before people could actually use the visual styles. Curious users snooping around their Windows XP files discovered that Windows XP had a skinning engine just like many other applications that had the whole look of the operating stores in a file on the hard drive in the themes folder called luna.msstyles. This file contains all of the data for the new Windows XP look.
Then, just as with the boot and logon screens, people started to use resource hacking tools such as Resource Hacker to open up luna.msstyles and replace the bitmaps stored within the file with image files they made. Additionally, you could use programs like Resource Hacker to edit the settings files stored within the visual style as well to edit all of the sizes of the different Windows components.
The possibilities that applications such as Resource Hacker gave users were unlimited, except for the fact that there still was no way to test and use the new user-made visual styles becausethey were not digitally signed by Microsoft. Eventually, that all changed, as you know from the last few sections, and users were able to use their own visual styles.
Now there are several different ways that you can make your own visual style. You can use the Resource Hacker approach and manually open up your luna.msstyles file and replace bitmaps in the file with ones you made yourself. This process can be a very long and difficult one when you are trying to design a completely different visual style. This method would really only make sense to use if you just wanted to replace one part of a visual style, such as the green Start button.
If for some reason you just don’t like the green Start button, then you can open up the file in Resource Hacker and look for the bitmap on which to work. First, you will probably want to extract the bitmap from the file so that you can work on it in your favorite image editing program. Then, once you are finished, just replace the bitmap in the file with your modified version. Hit Save As, give the file a new name, and you are finished once you create a new folder for the name of the visual style.
If you want to make a completely new visual style with a new look or modify an existing one beyond changing one little component, then using a commercial editor is a must.TGT Soft, the company that brought you Style XP and the first patch for the visual style engine, has come out with an editor known as StyleBuilder.
StyleBuilder is an amazing program that TGT Soft created after they found out how the visual style file was compiled. It provides the user with an easy-to-use visual front for editing the visual style files. Instead of using a resource hacker and searching for a specific bitmap to replace, you can just navigate through the menus and click the object that you want to replace within the editor. This saves a lot of time and makes it feasible to create a whole visual style from scratch.
To get started, download a copy of StyleBuilder from TGT Soft’s Web site, located at
www.tgtsoft.com/download.php. Sometimes, the best way to learn something is to start by modifying a visual style. Once you download and install a copy of StyleBuilder, perform the following steps to learn how to import an existing visual style, make changes to it, and then save it for use on your computer and distribution on the Internet:
1. Start up StyleBuilder by navigating though the TGT Soft folder in the Start Menu and selecting StyleBuilder.
2. Say that you’d like to import the iBar 4 visual style that you use on your computer and want to make some changes to it.When StyleBuilder is starting up, click the File Menubar item and select the Import .msstyle file.
3. Next, you will have to fill in the two boxes on the import window. Specify the .msstyles file of the visual style that you want to import to modify. Then specify the folder that you want all of the settings and images to be extracted to so that StyleBuilder can edit the files.
4. When you are finished filling in the two boxes, hit the OK button to start the import
process.
5. After a few seconds, the import should be done and you will be notified if the import has been successful or not. If it has, you will have the option to open up the newly created StyleBuilder files to edit the visual style. Click the Yes button so that you can edit the files.
6. StyleBuilder will now open up the imported visual style for editing. First, get familiar with the interface. On the left-hand side of the screen are the buttons that you use for navigating between different parts of the visual style to edit, such as the Task Bar, User Pane, and Tracker & Progress. Also, you will see different section header buttons that indicate the current color scheme of the visual style that you are editing.
7. Editing the different settings and images is easy with StyleBuilder. Just click the object that you want to edit with your mouse in the preview window. Alternatively, you can navigate through the setting tree to easily get to a specific items settings.
8. To edit an image, just right-click it and select Edit. If you want to use a specific program, you will have to set up your graphic editors in StyleBuilder by right-clicking an image and selecting Edit With from the menu. Additionally, you can specify a different image file by clicking the ImageFile entry on the list and then hitting the Choose button.
9. Once you have your images replaced, you can play around with the settings for the visual style, such as the object sizes, borders, and fonts. All of these settings can be adjusted by selecting an object from the list on the Properties tab and editing the values on the right in the textboxes.
10. As you are working on your visual style, you may want to test it to see how it looks, as the Preview window doesn’t always give you an accurate depiction of how it will look on your computer. You can do so by clicking the Apply button on the toolbar. Included is also a cool test feature that will allow you to view the current visual style applied on a window that has every possible window object that you can think of so that you can see how your visual style will look in all varieties of applications.
11. When you have finished modifying a visual style, and have created your own custom style, you are ready to compile it and, if you want, export it for distribution on the Web. Click the Actions menu bar item and select Compile. You will be asked to name your visual style; once you name it, it will be compiled and placed in your documents folder. If you would like to distribute your visual style on the Web to share with your friends or the rest of the world, click the ZIP file from the toolbar on the top and specify what you want to include and click OK. Then, you can e-mail your friends this ZIP file, which, by default, is saved in your documents folder, or you can submit it to Web sites such as themexp.org.
Making your own visual style from scratch requires a lot of graphical and artistic skills. But if you just want to tweak your favorite visual style, then you will have no problem doing so with the help of StyleBuilder.
You have now mastered the world of visual styles. You have discovered how you can make your system accept non-Microsoft visual styles so that you can take advantage of the new skinning engine built into Windows XP. And now you also know how to modify and make your own visual styles.
Now that you have finished changing the visual styles using one of the two methods that I described, you can customize the look of your computer a little more by tweaking the visual style. One thing that I always like to customize after I change the visual style is the title bar height. You can easily do so by changing the window metrics:
1. Right-click the desktop and select Properties.
2. Then, click the Advanced button on the Appearance tab.
3. Click either the active or inactive title bar of the preview image and then adjust the Size setting next to the Item drop-down box.
4. While you are changing the size, you might want to also customize the fonts. You can do so by clicking the text for which you want to change the font, and then selecting the font.
5. Click OK to save your changes.
6. Click OK once more to close Display Properties and activate the new changes.
Customizing the way a visual style looks is always refreshing. Usually when you install any system, you find a few things that you wish were just a little different. Now you know how to refine your desktop to look its best.
Read More..


